The process for this is same as we did for Windows XP & Vista. Follow the simple steps below to install XP after Windows 7.
1) Make a clean Install of Windows XP on ‘D’ partition of your hard drive. Assuming, Windows 7 is installed on ‘C’ partition.
2) After restarting system, you will directly boot into Windows XP. That’s because XP writes its bootloader over Windows 7. So, we need to restore the Win 7 bootloader.
3) To restore 7, you need to Boot from the Windows 7 DVD and “Repair your computer”. Check this article “How to Perform a Startup Repair in Windows 7” to perform repair.
4) After repairing, your system will restart and boot into Windows 7.
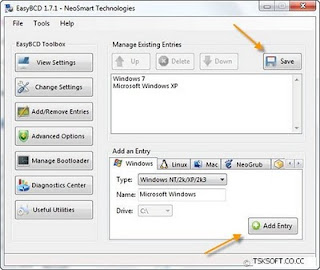
5) Download and Install EasyBCD on your Windows 7 to add boot entry for XP.
6) Launch the app and go to Add/Remove Entries. Under “Add an Entry” open the Windows tab and select the Type as “Windows NT/2k/XP/2k3”.

Give it a name like ‘Windows XP’ and click on ‘Add Entry’. Then select Save.
That’s it. Now restart you PC and you’ll be presented with two options, Windows 7 and Windows XP.


0 comments :
Post a Comment
Only Comments which have valuable feedback are approved to reduce the spam comments. So, take a note that we approve only right feedback related to the article you comment.