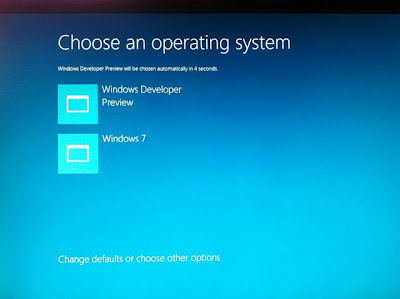
If you’re into wild stuff and you want to be creative with your operating system. You can try to dual boot your Windows 8 and have Windows 7 as your default OS. The internet is teeming with a lot of guides on how to install Windows 8 but if you’re wary that the new operating system may not be your cup of tea and still want your old loyal dog Windows 7. You can make a multi boot system for both Windows operating system. Here’s a simple way on how to do it.
Windows 8 boasts off its boot manager which is designed to use the Metro design manager. Not only is it touch-friendly and shiny but also you can boot to another operating system using its sleek icon. Though it boots slower than other boot managers, it provides more tools and features than previous versions.

A bit of a reminder that the multi boot installation only works for Windows 7 and Windows Vista. It won’t work with Windows XP or with Linux operating system as other review shows. Although third party tools can be downloaded (EasyBCD 2.2) which may work to a fix.
If you have a clean hard drive, install Windows 7 first. If Windows 7 is present then backup first before you attempt to proceed with the multi boot installation. Back up your photos and documents just in case any untoward incident happens. Windows 7 has a built in backup program that can secure your files or third party software can do the job. If you don’t have Windows 8 CD you can download it from this link

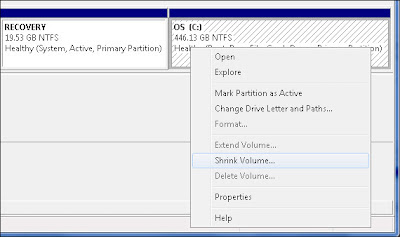
A partition should be created of at least 16 GB and around 20 GB for a 64 bit Windows 8 for the side by side installation to work. Type “Disk Management” in the Start Search button on the bottom left hand of your screen and this will display "Create and format hard disk partitions".
Examine what you have on your partitions in your hard drive. Try to look for secondary partitions that you can use for your Windows 8. You can just ignore other partitions like partition recovery or partitions that are smaller than 20 GB. If you can find there a large partition, maybe that portion may come from the C: drive. From the context menu choose “Shrink Volume” A dialog “Querying Shrink Space” will momentarily appear. It will display another message on how much free space you want to allocate on the drive in MB. Enter a size not less than 20 GB then push the Shrink button.
If everything is allocated and is reflecting correctly, you can pop in the Windows 8 CD and then restart the PC. After putting the necessary settings (language). Click on Install Now. Choose custom and not upgrade. You will be presented with the drive allocation option. Please select the unallocated space that was created. Make sure that it coincides with GB that was created earlier. Click New and then click Apply. After hitting Next, installation will start and everything is good to go.
Author Bio :
Rahul is an ECE Engineering Student from JIIT . He Loves to Blog about anything he is interested in . You can follow him on Tech Blog for Technology related updates .
Rahul is an ECE Engineering Student from JIIT . He Loves to Blog about anything he is interested in . You can follow him on Tech Blog for Technology related updates .


0 comments :
Post a Comment
Only Comments which have valuable feedback are approved to reduce the spam comments. So, take a note that we approve only right feedback related to the article you comment.